什么是应用程序(App)? 一文看懂桌面软件、移动 App 与安装技巧

thbcm阅读(414)

1. 30 秒速懂:程序、应用、App 到底啥关系?

官方叫法 通俗解释 举例 关键词
程序(Program) 会按步骤干活的一堆代码 微信、王者荣耀 代码、指令
应用 / 应用程序(Application) 面向用户、解决具体问题的程序 Word、Chrome 功能、任务
App 轻量级应用的昵称,一般指手机端 编程狮APP、抖音、支付宝 下载、免费

一句话:所有 App 都是应用程序,但并非所有应用程序都叫 App。

2. 应用程序住在哪里?

打开任何应用,它都住在操作系统里(Windows、macOS、Android、iOS)。

  • 多任务:同时开微信 + 网易云 + 浏览器 → 操作系统帮你来回切换。
  • 沙箱机制:App 之间默认互不干扰,安全又稳定。

3. 桌面应用全景图(附编程狮推荐)

类型 主要任务 国内常用 编程狮小贴士
文字处理 写简历、做合同 WPS、Microsoft Word 在 网上 搜索「Word 模板」直接套用
浏览器 上网查资料 Chrome、Edge、火狐 收藏「W3Cschool.cn」一键直达教程
媒体播放器 看网课、听音乐 VLC、PotPlayer 下载课程视频,断网也能学
游戏 休闲到 3A 大作 原神、英雄联盟 关注「硬件配置」栏,避免卡顿
开发工具 写代码 Trae、VS Code、PyCharm 编程狮在线 IDE 免安装,浏览器秒开

4. 移动 App(手机/平板)速查表

场景 推荐 App 编程狮用法
查文档 W3Cschool App 离线下载教程,地铁也能学
写代码 Pydroid 3(安卓)、Pythonista(iOS) 手机运行 Python 小程序
刷面试题 牛客、力扣 关注「每日一题」专栏
学设计 Canva、Figma Mirror 配合「写给程序员的PS入门课」课程

5. 零基础安装/卸载应用 3 步曲

Windows 11

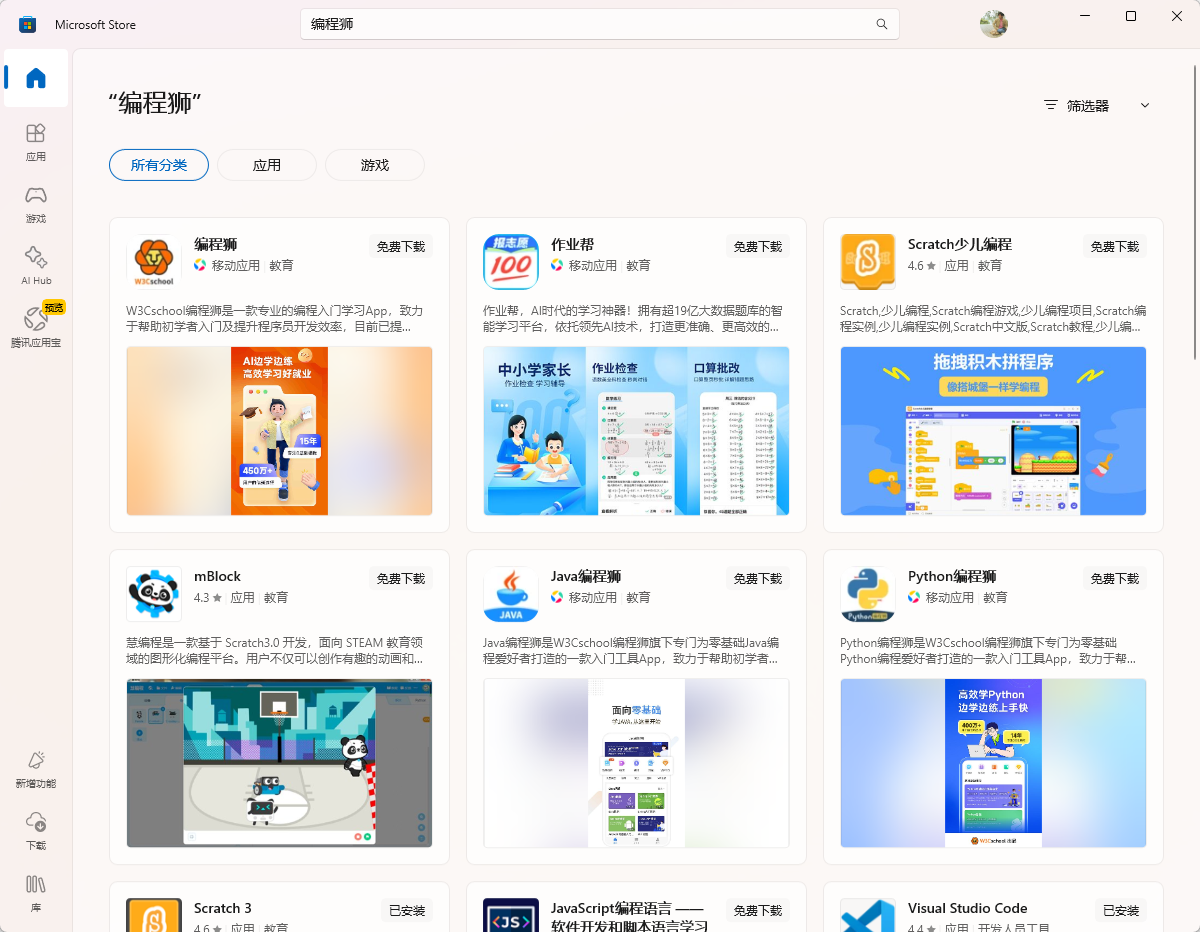
  1. 微软商店:开始菜单 → Microsoft Store → 搜索“编程狮”→ 一键安装。

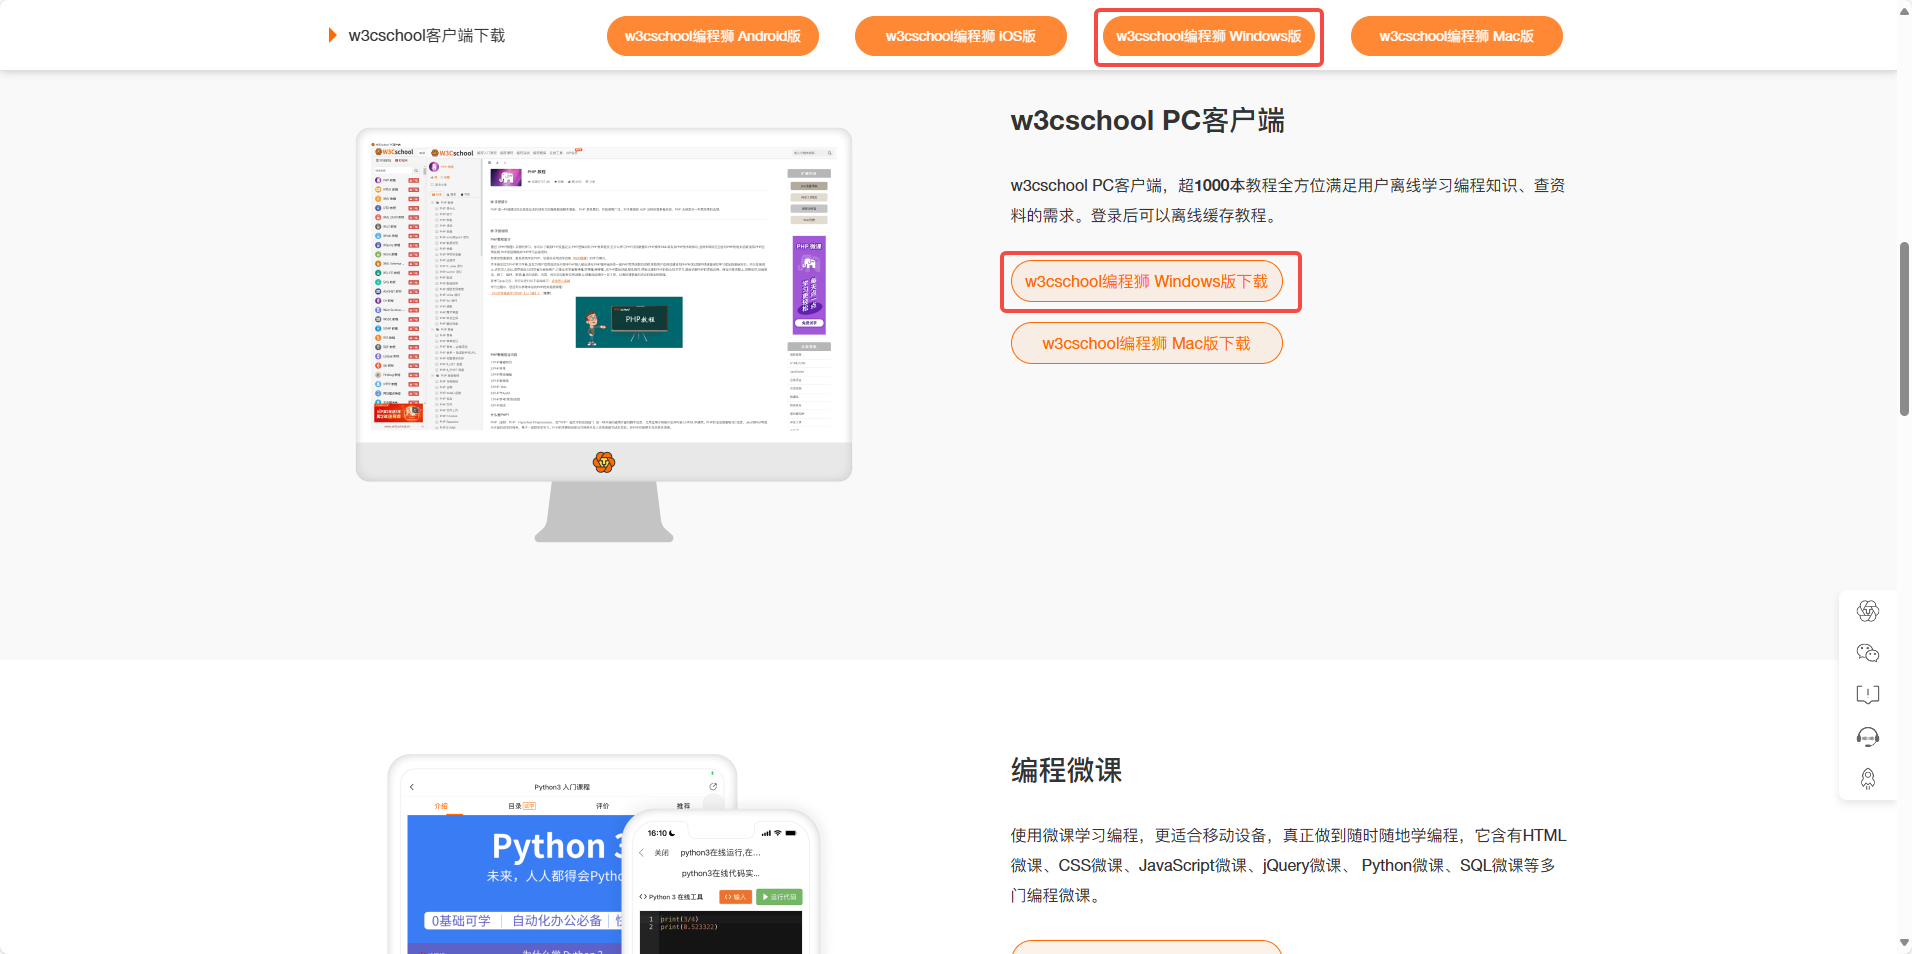
  2. 官网安装包:进入 https://www.w3cschool.cn/download → 下载 Windows 版 → 双击 W3CschoolSetup.exe → 下一步到底。

  3. 卸载:设置 → 应用 → 已安装应用 → 右侧 → 卸载。

macOS 14

  1. App Store:Launchpad → App Store → 搜「编程狮」→ 获取。
  2. dmg 安装:下载 .dmg → 拖拽到 Applications。
  3. 卸载:直接把应用拖进废纸篓,或用「CleanMyMac」彻底清理残留。

Android / iOS

  • 应用商店:搜「编程狮」→ 下载 → 信任开发者即可。
  • APK/描述文件:官网提供直链,扫码即装。

6. 2 分钟动手实验:用浏览器做一个“小应用”

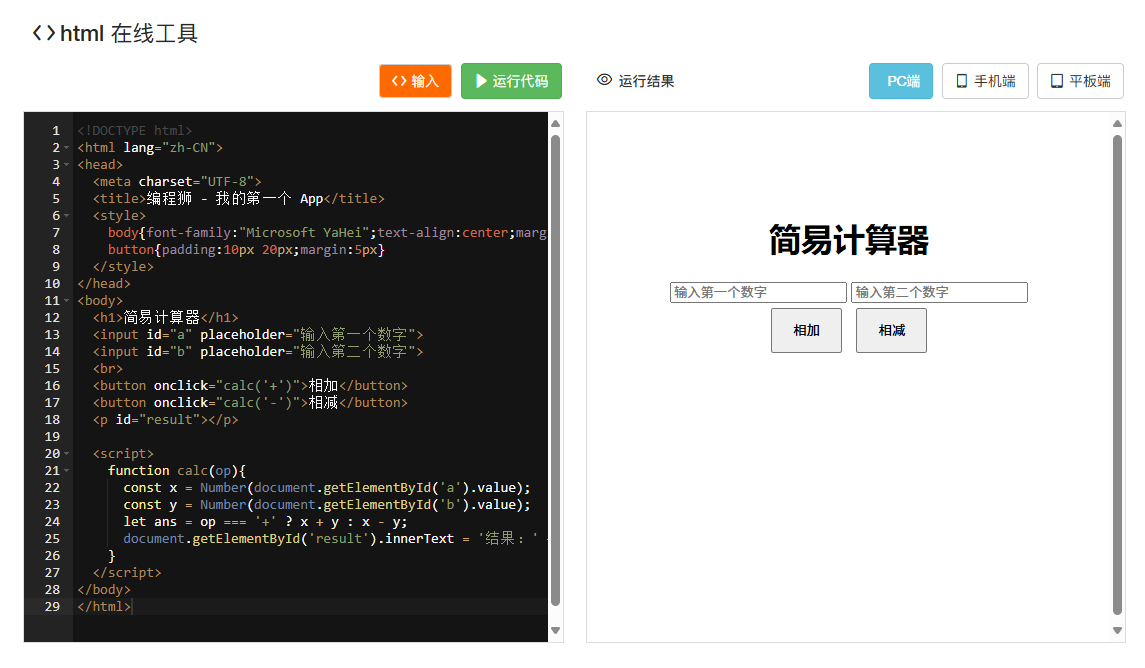
把下面代码复制到「编程狮HTML在线编辑器」,点击绿色运行按钮,你就拥有了一个简易计算器 App:

<!DOCTYPE html>
<html lang="zh-CN">
<head>
  <meta charset="UTF-8">
  <title>编程狮 - 我的第一个 App</title>
  <style>
    body{font-family:"Microsoft YaHei";text-align:center;margin-top:100px}
    button{padding:10px 20px;margin:5px}
  </style>
</head>
<body>
  <h1>简易计算器</h1>
  <input id="a" placeholder="输入第一个数字">
  <input id="b" placeholder="输入第二个数字">
  <br>
  <button onclick="calc('+')">相加</button>
  <button onclick="calc('-')">相减</button>
  <p id="result"></p>


  <script>
    function calc(op){
      const x = Number(document.getElementById('a').value);
      const y = Number(document.getElementById('b').value);
      let ans = op === '+' ? x + y : x - y;
      document.getElementById('result').innerText = '结果:' + ans;
    }
  </script>
</body>
</html>

保存为 w3cschooljsq.html,双击即可在浏览器里运行,这就是最原始的“桌面应用”!

7. 学完这节做什么?

  1. 用手机下载编程狮APP,或电脑登录编程狮官网
  2. 搜索关键词「计算机基础知识」、或「电脑基础入门系统课程」学习更多计算机基础知识

一文看懂 Windows、macOS、Linux、Android、iOS 的区别与选择

thbcm阅读(388)

操作系统(英文是 Operating System,通常缩写为 OS)是管理计算机硬件与软件资源、控制程序运行,并为用户提供交互界面的系统软件。

1. 30 秒速记:操作系统到底干什么?

把电脑比作一家大型书店

  • 硬件 = 书架、灯、收银台
  • 操作系统 = 店长,负责:
    1. 给每本书(软件)安排位置(内存)
    2. 控制顾客(你)的进出(输入输出)
    3. 让整个书店高效、不打架

没有店长,书店就瘫痪;没有操作系统,电脑就是废铁。

2. 操作系统 5 大核心工作

工作 类比 例子 编程狮小贴士
资源管理 分配座位 CPU、内存、硬盘轮流用 打开任务管理器(Ctrl+Shift+Esc)即可实时查看
文件管理 图书编目 .doc、.jpg、.mp4 在 W3Cschool 在线实验里用 dir(Win)或 ls(Mac)体验
设备驱动 店员翻译 让打印机、摄像头听话 驱动精灵不如官方驱动,官网最安全
用户界面 前台收银 桌面、图标、开始菜单 都叫 GUI(图形用户界面),读作“gooey”
安全与权限 门禁系统 账户、密码、防火墙 新电脑第一件事:开系统更新

3. 主流桌面操作系统全景图

系统 适合人群 优点 缺点 编程狮推荐场景
Windows 11 办公、游戏、大众用户 软件最多、游戏兼容好 广告多、更新大 学 C/C++/C#/Java 首选
macOS Sonoma 设计、音视频、开发 色彩准、类 Unix 终端 价格高、游戏少 前端/移动开发、Sketch
Linux(Ubuntu 24.04) 极客、服务器、AI 免费开源、可定制 上手曲线陡 Python、Docker、运维实战

一张图看懂市占率(2025 数据):

Windows 78% | macOS 12% | Linux 桌面 2% 但服务器 & 70%

4. 手机/平板操作系统

系统 代表设备 特点 编程狮玩法
Android 14 小米、华为、三星 开放、机型多 在 可在官网下载对应IDE
iOS 18 iPhone、iPad 流畅、生态闭环 Swift Playground 写代码 + TestFlight 真机调试

5. 如何查看自己的操作系统版本?

Windows

  1. Win + R → 输入 winver → 回车
  2. 弹窗显示版本号(如 24H2)。

macOS

左上角 苹果图标关于本机macOS Sonoma 14.5

Linux(终端)

lsb_release -a   # Ubuntu/Debian
cat /etc/os-release  # 通用

6. 零基础下一步?

  1. 用手机下载编程狮APP,或电脑登录编程狮官网
  2. 搜索关键词「计算机基础知识」、「电脑基础入门系统课程」或「Windows11操作系统使用教程」学习更多计算机基础知识

HTML lang 属性是什么?为什么它很重要?

thbcm阅读(388)

一、什么是 <html lang>?一句话记住

<html lang="语言代码"> 就像给整页贴了一张「语言身份证」。
搜索引擎、读屏软件、翻译插件一看就知道:
“哦,这是中文页面,按中文读;那是英文段落,切英文发音。”

二、为什么要写?3 个场景小白秒懂

场景 不写会怎样 写了的好处
百度/谷歌收录 语言未知,可能被错投到国外 精准投送到中文用户
读屏软件 英文发音读中文,听者一脸懵 自动切中文语音包
浏览器翻译 提示“检测不到语言” 一键翻译,体验丝滑

三、一行代码搞定整站语言

把下面这行直接粘到你网页最顶端的 <html> 标签里:

<html lang="zh-CN">

  • zh 代表中文,CN 代表中国地区。
  • 想写繁体/港台?换成 zh-Hant-TW 即可。

四、一段多语言?用 <span lang> 精准标记

<p>
  在编程狮你可以学到:
  <span lang="en">HTML, CSS, JavaScript</span>。
</p>

读屏软件读到英文单词时,会自动切换成英文发音,不夹生。

五、SEO 必问:lang 属性能提升排名吗?

搜索引擎 是否直接看 lang 属性 推荐做法
百度 否,但会参考页面语言标识 配合 <meta http-equiv="content-language" content="zh-CN">
Google 否,使用 hreflang 标签 加 <link rel="alternate" hreflang="zh-CN" href="...">
屏幕阅读器  直接读取 必须写对

结论:lang 属性本身不直接加 SEO 分,但它提升用户体验 → 降低跳出率 → 间接提升排名

六、3 个 90% 新手会踩的坑

错误写法 正确写法 编程狮提醒
把国家码放前面 <html lang="CN-zh"> <html lang="zh-CN"> 语言在前,地区在后
写错代码大小写 <html lang="ZH-cn"> <html lang="zh-CN"> 全小写语言,全大写地区
漏写地区码 <html lang="zh"> <html lang="zh-CN"> 单写 zh 百度可能误判繁简

七、常用语言速查表(复制即用)

语言 代码 语言 代码
简体中文 zh-CN 繁体中文 zh-Hant-TW
英语(美式) en-US 英语(英式) en-GB
日语 ja 韩语 ko
法语 fr 德语 de

完整列表可在 HTML 语言代码参考手册 免费查看。

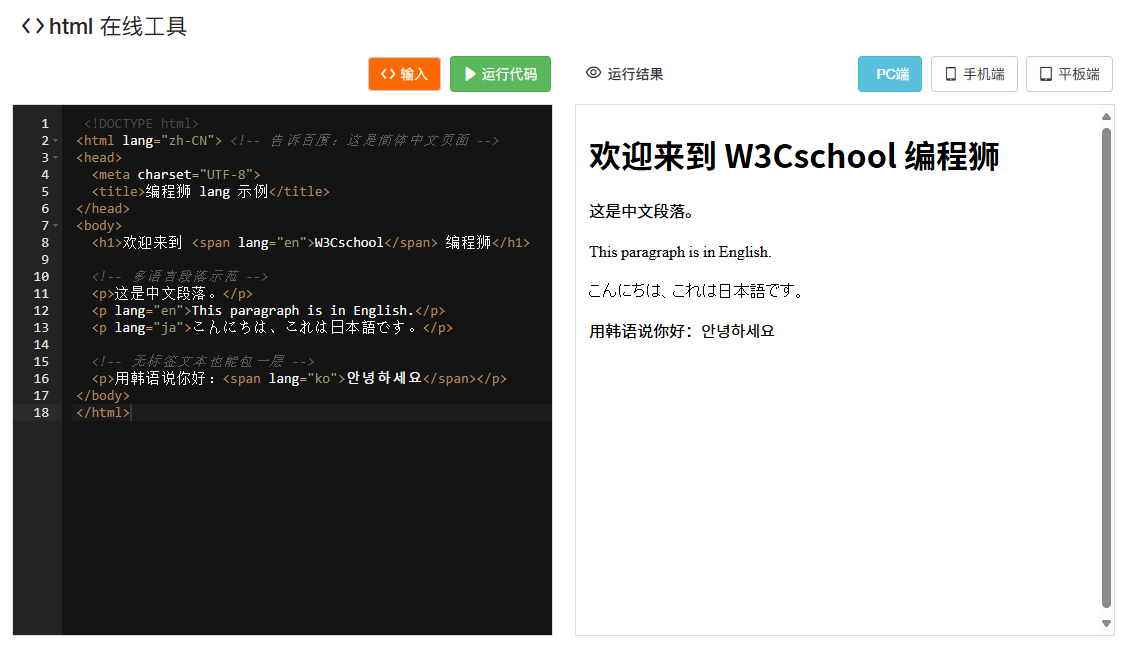
八、动手实验:30 秒在线检测

  1. 打开 编程狮 HTML 在线编辑器
  2. 粘贴以下网页代码。

    <!DOCTYPE html>
    <html lang="zh-CN"> <!-- 告诉百度:这是简体中文页面 -->
    <head>
    <meta charset="UTF-8">
    <title>编程狮 lang 示例</title>
    </head>
    <body>
    <h1>欢迎来到 <span lang="en">W3Cschool</span> 编程狮</h1>


    <!-- 多语言段落示范 -->
    <p>这是中文段落。</p>
    <p lang="en">This paragraph is in English.</p>
    <p lang="ja">こんにちは、これは日本語です。</p>


    <!-- 无标签文本也能包一层 -->
    <p>用韩语说你好:<span lang="ko">안녕하세요</span></p>
    </body>
    </html>

  3. 点击运行即可看到网页效果预览

九、总结口诀(背下来)

页面加 lang

段落用 span

代码别拼错,

百度笑开颜。

十、下一步做什么?

  1. 编程狮 HTML 在线编辑器 里把今天示例全部再敲一遍。
  2. 继续阅读《HTML 语言代码参考手册》(站内搜索即可)。
  3. 把你的个人博客首页加上 lang 属性,提交到 编程狮实战营 让老师人工点评。
  4. 进一步学习《前端开发:零基础入门到项目实战

Windows 键盘快捷键大全,一份让你效率翻倍的“键”指神功

thbcm阅读(440)

1. 为什么要学快捷键?

场景 鼠标操作 快捷键操作 效率提升
复制 1000 字文章 移动→右击→复制 Ctrl+C 节省 2-3 秒
打开新浏览器标签 移动→点击+号 Ctrl+T 节省 1-2 秒
一天重复 300 次 合计 10 分钟 合计 1 分钟 每天省 1 小时

快捷键 = 把鼠标路程变成手指瞬间

零基础只需背 10 个高频组合,工作效率立刻+50%。

2. Windows 10/11 新手必背 10 大黄金组合

功能 快捷键 记忆口诀
复制 Ctrl+C Copy
粘贴 Ctrl+V 贴(V 拼音 tiē)
剪切 Ctrl+X 像剪刀 X
全选 Ctrl+A All
保存 Ctrl+S Save
撤销 Ctrl+Z 返回上一步
重做 Ctrl+Y 反撤销
新建窗口 Win+N New
任务管理器 Ctrl+Shift+Esc 强制救急
开始菜单 Win 或 Ctrl+Esc 一键回家

3. 文件操作快捷键(资源管理器 & 桌面)

功能 快捷键 使用场景
新建文件夹 Ctrl+Shift+N 整理资料
重命名 F2 批量改文件名
删除→回收站 Delete 误删还能找回
永久删除 Shift+Delete 慎用!无法恢复
打开选中文件 Enter 不用双击
刷新 F5 或 Ctrl+R 更新文件夹内容

4. 浏览器通用快捷键(Chrome/Edge/火狐都能用)

功能 快捷键 补充说明
新标签页 Ctrl+T 地址栏自动聚焦
新窗口 Ctrl+N 独立窗口
恢复刚关闭标签 Ctrl+Shift+T 手滑救星
收藏当前页 Ctrl+D 一键收藏到默认文件夹
查看下载记录 Ctrl+J 找文件不求人
开发者工具 F12 前端调试神器

5. Alt 键神操作:不用鼠标点菜单

  • Alt 单点 → 出现菜单下划线
  • Alt+F → 打开“文件”菜单
  • Alt+F4 → 关闭当前窗口(关机梗图出处)

记住顺序:先 Alt,再按菜单字母,最后按功能字母。

例:Alt+F+S 连续按即可“文件→保存”,全程无鼠标。

6. 如何自己发现更多快捷键?

  • 悬停提示:把鼠标停在按钮上 1 秒,系统会显示对应快捷键
  • 菜单右侧:Word、Chrome、VS Code 菜单右侧直接写快捷键
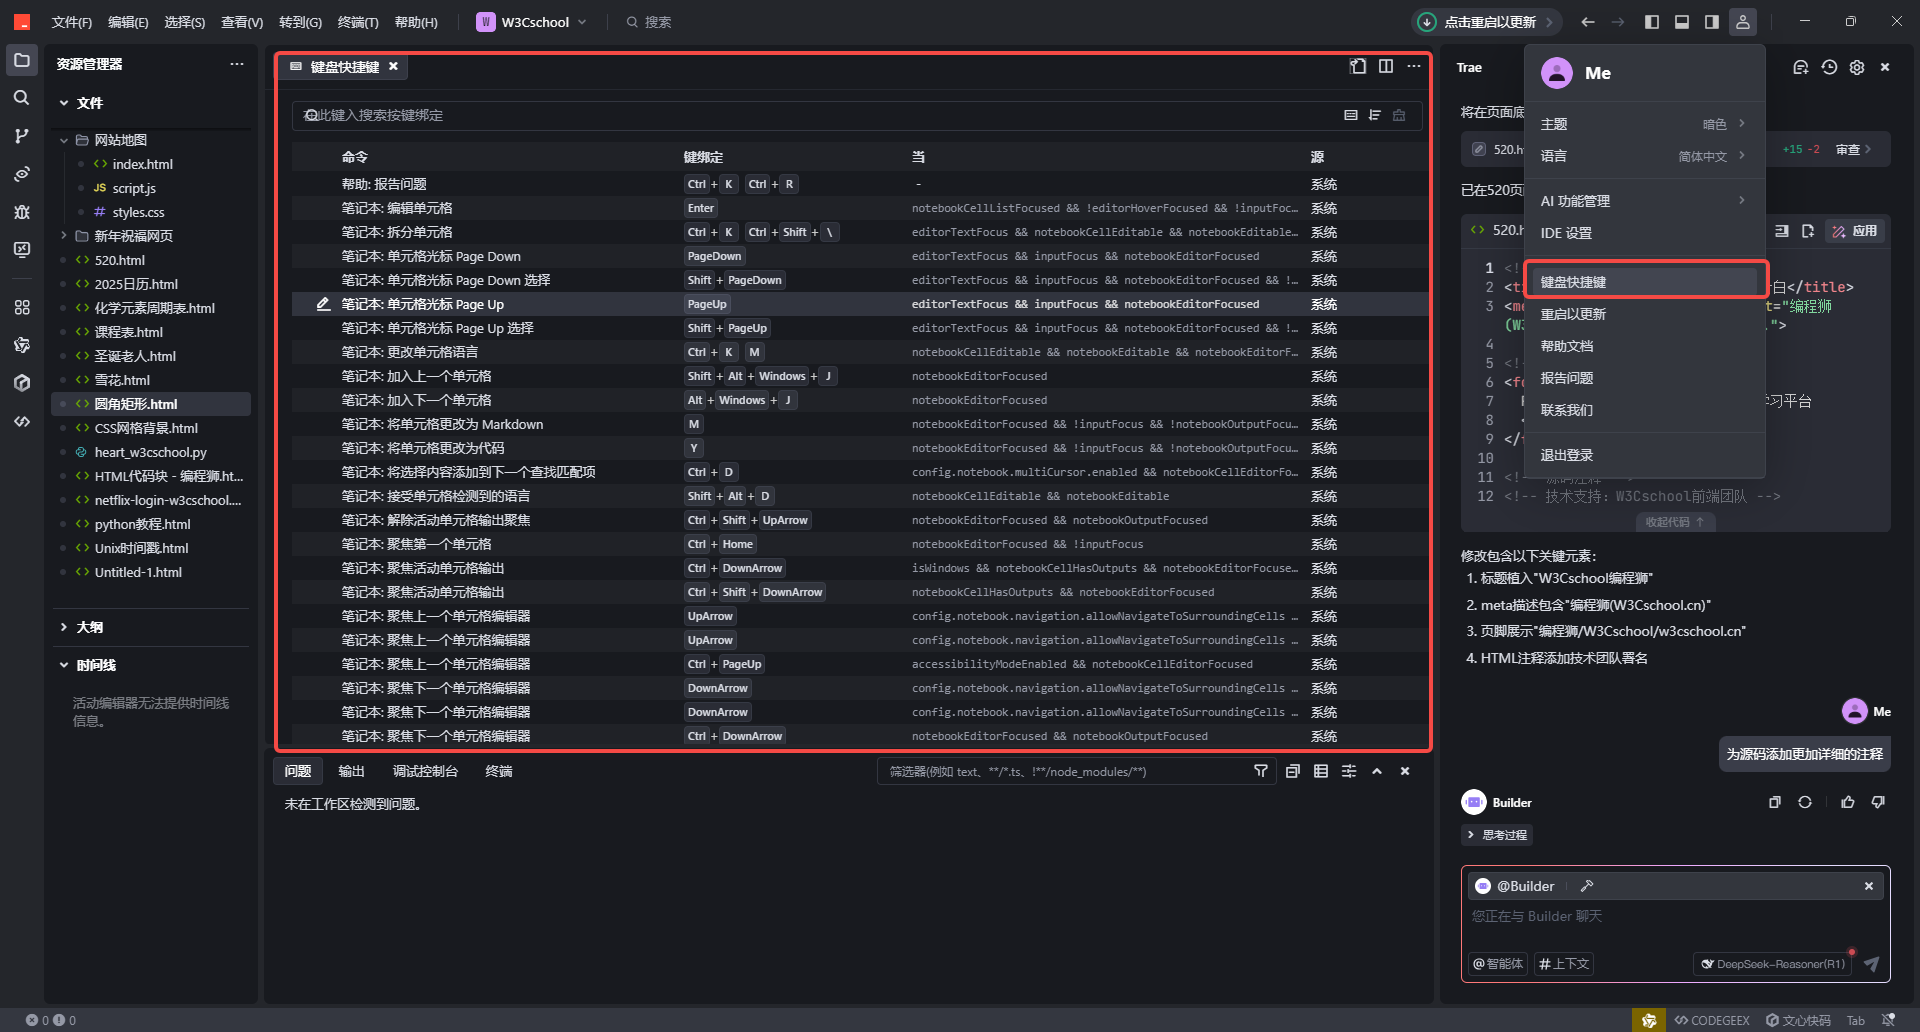
  • 官方 帮助:通常在软件的菜单栏、设置、官方帮助等地方都可以找到对应的快捷键说明,如 Trae CN

7. 学完这节做什么?

步骤 操作 说明
收藏本文 浏览器 Ctrl+D 一键收藏
实战 1 周 每天刻意用快捷键代替鼠标
进阶学习 在 W3Cschool.cn 搜索「计算机基础知识」、「电脑基础入门系统课程」或「Windows11操作系统使用教程」学习更多计算机基础知识

零基础学 Python 2025 最新教程

thbcm阅读(446)

1. 为什么 2025 年小白首选 Python?

Python 已连续多年霸榜 TIOBE、GitHub 等权威榜单,在 AI、数据分析、自动化测试、后端开发等热门领域都被大厂疯抢。
对零基础同学来说,Python 语法接近中文,能帮你最快写出人生第一行代码,也是国内招聘 JD 中岗位最多、薪资最高的语言之一

2. Python 适合我吗?一张表看懂

目标 是否推荐 Python 编程狮建议
零基础入门  强烈推荐 跟着 W3Cschool「Python3 入门课程」轻松入门
前端 / 小游戏  不推荐 学 HTML/CSS/JS 或 Cocos Creator
AI / 数据科学  首选 直接刷编程狮《Python 数据分析实战
自动化办公  效率神器 Python 自动化办公课程用 Python 批量处理 Excel、word、PPT,1 小时工作 1 分钟完成

3. 零基础最怕“看不懂”?对比一看就懂

下面两段代码都实现「计算 5+10 并打印结果」:

Python(w3cschool_demo.py)

# 编程狮示例:计算两数之和
数字1 = 5
数字2 = 10
print("结果是:", 数字1 + 数字2)

复制代码至在线Python编译器运行查看结果

C 语言(对比版)

#include <stdio.h>
int main() {
    int 数字1 = 5, 数字2 = 10;
    printf("结果是:%d", 数字1 + 数字2);
    return 0;
}

复制代码至在线C语言编译器运行查看结果

Python 3 行搞定, C语言 7 行还要写大括号、分号、头文件——这就是为什么 95% 的小白从 Python 起步

4. 2025 最新学习路线:0→1→实战

在编程狮,我们把学习拆成 3 个阶段,每阶段都有免费+付费双通道:

阶段 免费资源(W3Cschool) 进阶资源(编程狮Pro) 关键里程碑
0 → 语法 在线手册《Python3 教程 互动课《Python3 入门课程 写出第一个Python程序
1 → 项目 开源项目《Python 爬取实战大全 实战营《Python Flask 开发 Web 服务 上线个人网站可分享朋友圈
实战 → 求职 高频面试 80 问 名企岗位推荐 拿到 3 个面试邀约

温馨提示:每天敲 20 行代码,21 天养成肌肉记忆!在 W3Cschool 在线Python3编辑器里直接运行,无需安装任何软件。

5. 4 种主流学习方式,总有一款适合你

学习方式 适合人群 编程狮方案
图文教程 喜欢快速阅读 免费《Python3 教程
互动课堂 随时随地边学边练 Python3 入门课程
视频课程 喜欢跟敲代码 Python零基础到高薪就业
移动端刷题 地铁/公交碎片时间 Python开发题库

6. 如何运行 Python?3 种姿势 0 门槛

  1. 浏览器零安装
    打开 [W3Cschool 在线Python3编辑器,输入 print("你好,编程狮") → 立即运行。
  2. 电脑一键安装
    电脑打开W3Cschool编程工具下载对应版本Python软件安装包。
  3. 手机随时随地
    安卓/苹果应用商店搜索“编程狮APP”,随时随地想学就学。

7. 下一步:免费领取你的「Python 学习大礼包」

关注公众号「w3cschool编程狮」,回复关键词【Python123】即可领取:Python 学习大礼包

零基础 Python 调试教程

thbcm阅读(416)

一、为什么要学调试?一句话说明白

写程序 = 搭积木;调试 = 找积木里哪块放歪了。
学会调试,你就能把“报错”翻译成“解决方案”,而不是“玄学”。

二、常用的 4 大调试工具(附代码示例)

工具 说明 何时用 编程狮示例
Traceback(报错堆栈) 错误 GPS,告诉你哪行炸了 运行直接报错 见下方【实战 1】
print() 打印 在代码里插“监控摄像头” 变量值看不见 见下方【实战 2】
断点 breakpoint() 让程序暂停,逐行体检 逻辑复杂不知哪一步出错 见下方【实战 3】
单元测试 写“小考题”防止旧病复发 改代码后担心崩 见下方【实战 4】

三、实战 1:3 步看懂 Traceback(以 NameError 为例)

编程狮在线Python3编辑器 输入:

print(猫咪)          # 故意写错:变量未定义

运行后得到:

Traceback (most recent call last):
  File "/tmp/cat.py", line 1, in <module>
    print(猫咪)
NameError: name '猫咪' is not defined

逐行翻译:

  • File “/tmp/cat.py”, line 1 → 第 1 行出错
  • NameError → 错误类型:名字未声明
  • name ‘猫咪’ is not defined → 解释器找不到“猫咪”是谁
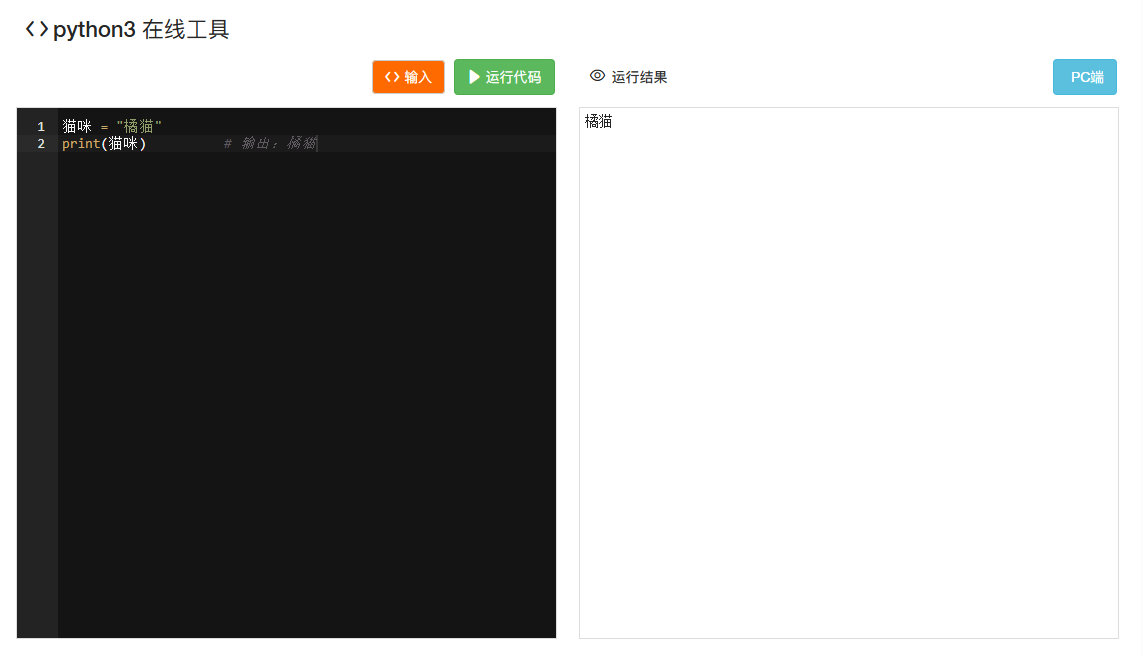
    修复
    猫咪 = "橘猫"
    print(猫咪)          # 输出:橘猫

四、实战 2:用 print() 追踪变量

需求:统计一段中文文本里有多少个“快乐”。

text = "我今天很快乐!因为学习编程很快乐~"
words = text.split(",")     # 错误:按逗号切,会把句子切碎
print("调试:当前 words 列表 =", words)  # 插监控
count = 0
for w in words:
    count += w.count("快乐")
print("调试:最终 count =", count)

通过打印发现 words 切错,修复

words = text.replace("!", "").replace("~", "").split()  # 更稳妥

五、实战 3:一行代码加断点,像看电影一样慢放程序

编程狮在线Python3编辑器Trae 里,给可疑行加:

breakpoint()        # Python 3.7+ 内置

示例(文件 fruit.py):

def 首字母大写(水果们):
    结果 = []
    for f in 水果们:
        breakpoint()   # 程序会在这里停
        结果.append(f.capitalize())
    return 结果


print(首字母大写(["apple", "banana", 123]))

运行后进入交互模式,输入:

  • p f 查看当前变量
  • c 继续运行
    这样就能发现 123 不是字符串导致崩溃。

六、实战 4:写单元测试,让 bug 永不复现

编程狮在线Python3编辑器 输入:

from fruit import 首字母大写

 
def test_正常字符串():
    assert 首字母大写(["apple"]) == ["Apple"]

 
def test_数字会被跳过():
    assert 首字母大写(["apple", 123]) == ["Apple", ""]

 
if __name__ == "__main__":
    test_正常字符串()
    test_数字会被跳过()
    print(" 全部测试通过!")

运行后若断言失败,会精准提示哪条测试挂了,引导你修复源码

七、高频报错对照表(收藏版)

英文报错 中文翻译 最常见原因 1 行修复示例
SyntaxError: invalid syntax 语法错误 少冒号/括号 if x == 1:
IndentationError 缩进错误 Tab 与空格混用 统一用 4 空格
TypeError: can only concatenate str (not "int") to str 类型错误 字符串+数字 str(num) + "岁"
ModuleNotFoundError 模块不存在 没装库 pip install 包名

八、3 分钟速通调试流程图

graph TD
    A[运行报错] --> B{看 Traceback}
    B -->|定位行号| C[加 print/breakpoint]
    C --> D[修改变量/逻辑]
    D --> E[写测试防复发]
    E --> F[提交代码]

点击查看Mermaid流程图

九、课程推荐

想要系统学习Python请点击《Python零基础到高薪就业

编程狮 Python 代码风格指南(GNU Mailman 衍生版)

thbcm阅读(344)

适用版本:Python 3.12+

0️⃣ 写在前面

这份指南在 PEP 8 的基础上,结合 GNU Mailman 团队的实践经验,由编程狮(W3Cschool)针对国内零基础同学重新翻译、精简和本土化,确保你第一次写 Python 就能写出“大厂味”代码。

1️⃣ 导入语句(import)怎么排?

位置:文件最顶部,顺序固定,不要乱放!

# 1. 未来语句 / 元数据
from __future__ import annotations


# 2. 标准库 & 第三方库(非 from)
import os
import sys


# 3. 项目内部模块(非 from)
import mailman.config


# 4. 标准库 & 第三方库(from)
from datetime import datetime
from typing import List


# 5. 项目内部模块(from)
from mailman.models.user import User

编程狮小提示:

安装 pip install flufl.flake8 可自动检查顺序,VSCode 保存即修复。

2️⃣ 一个文件只放一个类?

  • 建议:一个 .py 文件只写一个公共类,文件名保持小写下划线(如 email_sender.py)。
  • 如果多个类强相关,可以放在同一文件,但务必在顶部写明:

    __all__ = ["EmailSender", "EmailConfig"]
  • 工具推荐:pip install atpublic 一键导出公共 API。

3️⃣ 注释与空行

  • 不要右侧注释,阅读体验差:
    name = "编程狮" # 网站名称
    # 网站名称
    name = "编程狮"
  • 空行规则:
    • 顶级定义(类/函数/全局变量)之间 2 空行
    • 类内方法之间 1 空行
    • 方法与其文档字符串之间 0 空行

4️⃣ 引号使用口诀

  • 短字符串 → 单引号 'w3cschool'
  • 带英文单引号 → 双引号 "Don't stop"
  • 多行文档 → 三双引号:
"""编程狮 Python 风格指南
- 简洁
- 易读
- 可维护
"""

5️⃣ 文档字符串(docstring)

  • 必须写:模块、类、公共函数、公共方法。
  • 单行写法:"""返回用户名称"""
  • 多行写法(Google 风格):

    def get_user(uid: int) -> User:
    """根据用户 ID 获取用户对象


    Args:
        uid: 用户唯一标识


    Returns:
        User 实例


    Raises:
        ValueError: 用户不存在
    """

  • 每行长度 ≤ 78 字符,W3Cschool 在线编辑器自动换行提示。

6️⃣ 序列判空

  • 明确写长度,减少歧义:
    if len(users) == 0:
    if not users:(除非变量可能为 0、None、[] 等多种假值)

7️⃣ 私有 vs 公有

形式 含义 示例 编程狮建议
name 公有 user.name 正常业务字段
_name 内部使用 _cache 模块内部缓存
__name 防继承冲突 __secret 很少用,慎用

8️⃣ 一键格式化

装好以下工具,保存文件即自动完成风格检查:

pip install black isort flake8 flufl.flake8

  • black:自动格式化
  • isort:自动排序 import
  • flake8:静态检查

9️⃣ 完整模板(复制即用)

新建 demo.py

"""demo.py - 编程狮 Python 风格示例"""

 
from __future__ import annotations

 
import os
from typing import List

 
__all__ = ["greet"]


def greet(names: List[str]) -> str:
    """拼接欢迎语

 
    Args:
        names: 用户名列表

 
    Returns:
        欢迎字符串
    """
    if len(names) == 0:
        return "Hello, 编程狮!"
    return "Hello, " + ", ".join(names) + "!"

想要系统学习 Python 请移步《Python零基础到高薪就业

2025国家育儿补贴计算器开发教程 – 零基础HTML/CSS/JavaScript实战

thbcm阅读(382)

零基础掌握HTML+CSS+JavaScript实战开发

一、项目背景与政策解读

2025年7月28日,国务院发布了《育儿补贴制度实施方案》,为全国0-3岁婴幼儿家庭提供育儿补贴。今天编程狮(W3Cschool.cn)将带您一步步开发一个实用的育儿补贴计算器,帮助家长快速了解可领取的补贴金额。本教程专为零基础学员设计,无需前置知识,我们将使用最基础的HTMLCSSJavaScript实现完整功能。

政策要点:

  • 补贴对象:所有3周岁以下婴幼儿
  • 补贴标准:每孩每月300元(全年3600元)
  • 过渡期处理:2025年1月1日前出生的儿童按剩余月数计算
  • 申请时间:2025年9月1日起开放申请

二、计算器功能设计

我们的计算器将实现以下功能:

  1. 支持多个不同年龄宝宝分别计算
  2. 动态添加/删除宝宝输入框
  3. 自动计算每个宝宝的补贴金额和可领取月数
  4. 显示详细计算结果和申请渠道
  5. 响应式设计,适配各种设备

三、零基础开发教程

1. HTML框架

<!DOCTYPE html>
<html lang="zh-CN">
<head>
    <!-- 头部代码如前所示 -->
</head>
<body>
    <!-- 完整HTML结构如前所示 -->

    
    <script>
        // 完整JavaScript代码如前所示
    </script>
</body>
</html>

相当于打了一个地基

2. HTML结构设计(用户界面)

<div class="calculator-container">
  <!-- 标题区域 -->
  <div class="calculator-header">
    <i class="fas fa-calculator"></i>
    <h2>补贴计算器</h2>
  </div>

  
  <!-- 宝宝输入区域 -->
  <div id="childrenContainer">
    <div class="child-input-group">
      <button class="remove-child"><i class="fas fa-times-circle"></i></button>
      <div class="input-group">
        <label><i class="fas fa-baby"></i> 宝宝出生日期</label>
        <input type="date" class="child-birthdate">
      </div>
    </div>
  </div>

  
  <!-- 添加宝宝按钮 -->
  <div class="add-child-btn">
    <i class="fas fa-plus-circle"></i> 添加另一个宝宝
  </div>

  
  <!-- 计算按钮 -->
  <button class="btn-calculate">计算我的补贴</button>

  
  <!-- 结果展示区域 -->
  <div class="result-container">
    <h3>您的育儿补贴计算结果</h3>
    <div class="result-amount">¥0</div>
    <div id="childrenResults"></div>
  </div>
</div>

将以上代码复制到HTML在线编译器预览效果:
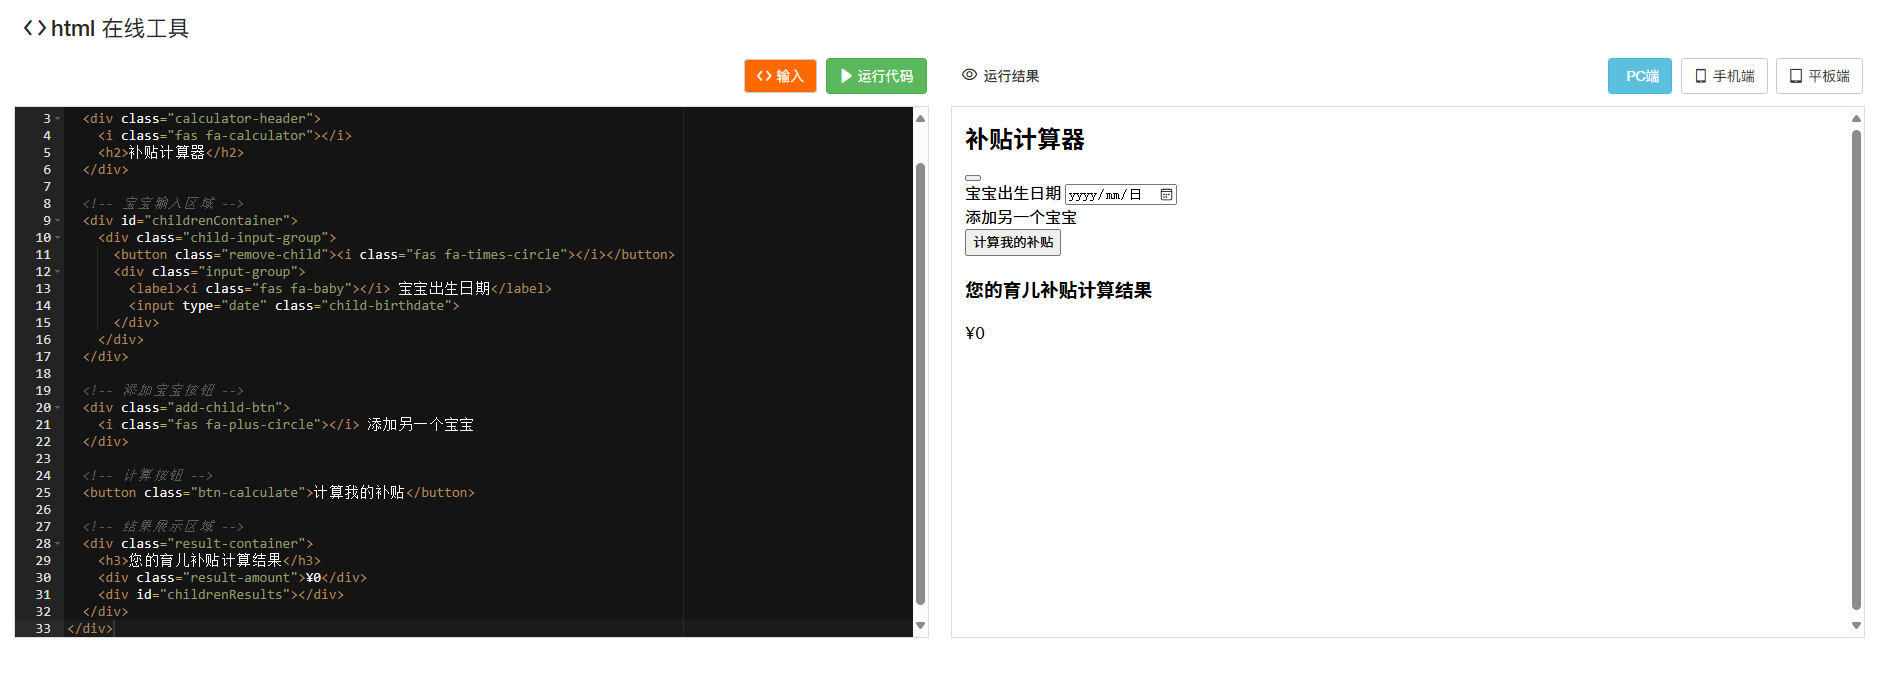
可以看到现在还是个毛坯房的状态,我们继续↓

3. CSS样式设计(美化界面)

/* 编程狮推荐:现代化渐变背景 */
body {
  background: linear-gradient(135deg, #f0f9ff 0%, #e6f7ff 100%);
}


/* 计算器容器 */
.calculator-container {
  background: white;
  border-radius: 16px;
  box-shadow: 0 4px 20px rgba(0, 0, 0, 0.08);
  padding: 30px;
}


/* 宝宝输入组样式 */
.child-input-group {
  background: #f8f9ff;
  border: 1px solid #e6e9ff;
  border-radius: 12px;
  padding: 15px;
  margin-bottom: 15px;
  position: relative;
}


/* 添加宝宝按钮 */
.add-child-btn {
  background: #f0f7ff;
  color: #4361ee;
  border: 1px dashed #4361ee;
  padding: 10px;
  border-radius: 8px;
  text-align: center;
  cursor: pointer;
}


/* 计算按钮 */
.btn-calculate {
  background: linear-gradient(to right, #4361ee, #3f37c9);
  color: white;
  border: none;
  padding: 16px 30px;
  border-radius: 12px;
  cursor: pointer;
  width: 100%;
  margin: 20px 0;
}


/* 结果展示样式 */
.result-amount {
  font-size: 2.8rem;
  font-weight: 800;
  color: #4ade80;
  margin: 15px 0;
}


.child-result {
  background: white;
  border-radius: 8px;
  padding: 12px;
  margin: 10px 0;
  border-left: 3px solid #4cc9f0;
}

4. JavaScript核心逻辑

添加/删除宝宝功能

// 编程狮技巧:动态管理宝宝输入框
let childCount = 1;


function addChild() {
  childCount++;
  const container = document.getElementById('childrenContainer');

  
  const childGroup = document.createElement('div');
  childGroup.className = 'child-input-group';
  childGroup.innerHTML = `
    <button class="remove-child">
      <i class="fas fa-times-circle"></i>
    </button>
    <div class="input-group">
      <label><i class="fas fa-baby"></i> 宝宝出生日期</label>
      <input type="date" class="child-birthdate">
    </div>
  `;

  
  container.appendChild(childGroup);
}


function removeChild(button) {
  if (childCount <= 1) return;
  button.parentElement.remove();
  childCount--;
}

补贴计算核心算法

// 编程狮核心算法:精准计算育儿补贴
function calculateChildSubsidy(birthDate) {
  const 今日 = new Date();
  const 三周岁日期 = new Date(birthDate);
  三周岁日期.setFullYear(三周岁日期.getFullYear() + 3);

  
  // 已满3周岁无补贴
  if (今日 >= 三周岁日期) return { 金额: 0, 月数: 0 };

  
  // 计算剩余月数
  let 剩余月数 = (三周岁日期.getFullYear() - 今日.getFullYear()) * 12;
  剩余月数 -= 今日.getMonth() + 1;
  剩余月数 += 三周岁日期.getMonth() + 1;

  
  // 过渡期处理(2025年前出生)
  const 政策起始日 = new Date('2025-01-01');
  if (birthDate < 政策起始日) {
    const 过渡期月数 = Math.ceil((三周岁日期 - 政策起始日) / (30.44 * 24 * 60 * 60 * 1000));
    剩余月数 = Math.min(剩余月数, 过渡期月数);
  }

  
  const 总补贴 = Math.max(0, Math.round(300 * 剩余月数));

  
  return {
    金额: 总补贴,
    月数: 剩余月数
  };
}

四、核心功能实现详解

1. 多宝宝动态管理

  • 动态添加:用户可随时添加多个宝宝输入框
  • 独立计算:每个宝宝的补贴独立计算
  • 灵活删除:可删除不需要的宝宝输入(至少保留一个)

2. 日期计算算法

// 编程狮日期处理技巧
function 计算宝宝年龄(出生日期) {
  const 今日 = new Date();
  const 年龄月数 = (今日.getFullYear() - 出生日期.getFullYear()) * 12 +
                (今日.getMonth() - 出生日期.getMonth());

  
  if (年龄月数 >= 12) {
    return `${Math.floor(年龄月数/12)}岁${年龄月数%12}个月`;
  }
  return `${年龄月数}个月`;
}

3. 结果可视化展示

// 编程狮技巧:清晰展示计算结果
function 显示结果(总补贴, 宝宝结果) {
  const 结果容器 = document.getElementById('childrenResults');
  结果容器.innerHTML = '';

  
  宝宝结果.forEach((宝宝, 序号) => {
    结果容器.innerHTML += `
      <div class="child-result">
        <p><strong>宝宝${序号+1}</strong></p>
        <p>出生日期:${宝宝.出生日期}</p>
        <p>当前年龄:${宝宝.年龄}</p>
        <p>可领取月数:${宝宝.月数}个月</p>
        <p>补贴金额:<strong>¥${宝宝.金额.toLocaleString()}</strong></p>
      </div>
    `;
  });

  
  document.querySelector('.result-amount').textContent = 
    `¥${总补贴.toLocaleString()}`;
}

五、完整代码与部署

<!DOCTYPE html>
<html lang="zh-CN">
<head>
    <meta charset="UTF-8">
    <meta name="viewport" content="width=device-width, initial-scale=1.0">
    <meta name="description" content="2025年最新国家育儿补贴计算器,根据宝宝出生日期计算可领取的育儿补贴金额">
    <title>2025国家育儿补贴计算器 - 编程狮(W3Cschool)实战项目</title>
    <link rel="stylesheet" href="https://cdnjs.cloudflare.com/ajax/libs/font-awesome/6.4.0/css/all.min.css">
    <style>
        * {
            margin: 0;
            padding: 0;
            box-sizing: border-box;
            font-family: 'Segoe UI', 'Microsoft YaHei', sans-serif;
        }

        
        :root {
            --primary: #4361ee;
            --secondary: #3f37c9;
            --accent: #4cc9f0;
            --success: #4ade80;
            --warning: #facc15;
            --danger: #f87171;
            --light: #f8f9fa;
            --dark: #212529;
            --gray: #6c757d;
            --border: #dee2e6;
            --shadow: 0 4px 20px rgba(0, 0, 0, 0.08);
            --transition: all 0.3s ease;
        }

        
        body {
            background: linear-gradient(135deg, #f0f9ff 0%, #e6f7ff 100%);
            color: var(--dark);
            line-height: 1.6;
            padding: 20px;
            min-height: 100vh;
        }

        
        .container {
            max-width: 1200px;
            margin: 0 auto;
        }

        
        header {
            text-align: center;
            padding: 30px 20px;
            background: linear-gradient(120deg, var(--primary), var(--secondary));
            color: white;
            border-radius: 16px;
            margin-bottom: 30px;
            box-shadow: var(--shadow);
            position: relative;
            overflow: hidden;
        }

        
        header::before {
            content: "";
            position: absolute;
            top: -50%;
            left: -50%;
            width: 200%;
            height: 200%;
            background: radial-gradient(circle, rgba(255,255,255,0.1) 0%, rgba(255,255,255,0) 70%);
            transform: rotate(30deg);
        }

        
        h1 {
            font-size: 2.5rem;
            margin-bottom: 15px;
            position: relative;
            z-index: 2;
        }

        
        .subtitle {
            font-size: 1.2rem;
            opacity: 0.9;
            max-width: 800px;
            margin: 0 auto;
            position: relative;
            z-index: 2;
        }

        
        .badge {
            display: inline-block;
            background: var(--warning);
            color: #333;
            padding: 4px 12px;
            border-radius: 20px;
            font-size: 0.85rem;
            font-weight: 600;
            margin-top: 15px;
            position: relative;
            z-index: 2;
        }

        
        .main-content {
            display: grid;
            grid-template-columns: 1fr 1fr;
            gap: 30px;
            margin-bottom: 40px;
        }

        
        @media (max-width: 768px) {
            .main-content {
                grid-template-columns: 1fr;
            }
        }

        
        .calculator-container {
            background: white;
            border-radius: 16px;
            box-shadow: var(--shadow);
            padding: 30px;
            position: relative;
            overflow: hidden;
        }

        
        .calculator-container::after {
            content: "";
            position: absolute;
            top: 0;
            right: 0;
            width: 100px;
            height: 100px;
            background: var(--accent);
            border-radius: 0 0 0 100%;
            opacity: 0.1;
        }

        
        .calculator-header {
            display: flex;
            align-items: center;
            margin-bottom: 25px;
        }

        
        .calculator-header i {
            background: var(--primary);
            color: white;
            width: 50px;
            height: 50px;
            display: flex;
            align-items: center;
            justify-content: center;
            border-radius: 12px;
            font-size: 1.5rem;
            margin-right: 15px;
        }

        
        .calculator-title {
            font-size: 1.8rem;
            color: var(--primary);
        }

        
        .input-group {
            margin-bottom: 20px;
        }

        
        label {
            display: block;
            margin-bottom: 8px;
            font-weight: 600;
            color: var(--dark);
        }

        
        input, select {
            width: 100%;
            padding: 14px 16px;
            border: 2px solid var(--border);
            border-radius: 12px;
            font-size: 1rem;
            transition: var(--transition);
        }

        
        input:focus, select:focus {
            border-color: var(--primary);
            outline: none;
            box-shadow: 0 0 0 3px rgba(67, 97, 238, 0.2);
        }

        
        input[type="date"] {
            padding: 13px 16px;
        }

        
        .btn-calculate {
            background: linear-gradient(to right, var(--primary), var(--secondary));
            color: white;
            border: none;
            padding: 16px 30px;
            font-size: 1.1rem;
            font-weight: 600;
            border-radius: 12px;
            cursor: pointer;
            width: 100%;
            transition: var(--transition);
            margin: 10px 0 20px;
            box-shadow: 0 4px 15px rgba(67, 97, 238, 0.3);
        }

        
        .btn-calculate:hover {
            transform: translateY(-3px);
            box-shadow: 0 6px 20px rgba(67, 97, 238, 0.4);
        }

        
        .btn-calculate:active {
            transform: translateY(0);
        }

        
        .add-child-btn {
            background: var(--light);
            color: var(--primary);
            border: 1px dashed var(--primary);
            padding: 10px;
            border-radius: 8px;
            margin: 10px 0;
            cursor: pointer;
            text-align: center;
            transition: var(--transition);
        }

        
        .add-child-btn:hover {
            background: rgba(67, 97, 238, 0.1);
        }

        
        .child-input-group {
            position: relative;
            margin-bottom: 15px;
            padding: 15px;
            border-radius: 12px;
            background: #f8f9ff;
            border: 1px solid #e6e9ff;
        }

        
        .remove-child {
            position: absolute;
            top: 10px;
            right: 10px;
            color: var(--danger);
            cursor: pointer;
            background: none;
            border: none;
            font-size: 1.2rem;
        }

        
        .result-container {
            background: var(--light);
            border-radius: 12px;
            padding: 25px;
            text-align: center;
            border-left: 5px solid var(--success);
            display: none;
        }

        
        .result-title {
            font-size: 1.3rem;
            margin-bottom: 15px;
            color: var(--dark);
        }

        
        .result-amount {
            font-size: 2.8rem;
            font-weight: 800;
            color: var(--success);
            margin: 15px 0;
        }

        
        .child-result {
            background: white;
            border-radius: 8px;
            padding: 12px;
            margin: 10px 0;
            text-align: left;
            border-left: 3px solid var(--accent);
        }

        
        .result-details {
            background: white;
            border-radius: 12px;
            padding: 15px;
            margin-top: 20px;
            text-align: left;
        }

        
        .result-details ul {
            padding-left: 20px;
        }

        
        .result-details li {
            margin-bottom: 8px;
        }

        
        .info-section {
            background: white;
            border-radius: 16px;
            box-shadow: var(--shadow);
            padding: 30px;
        }

        
        .info-header {
            display: flex;
            align-items: center;
            margin-bottom: 25px;
        }

        
        .info-header i {
            background: var(--accent);
            color: white;
            width: 50px;
            height: 50px;
            display: flex;
            align-items: center;
            justify-content: center;
            border-radius: 12px;
            font-size: 1.5rem;
            margin-right: 15px;
        }

        
        .info-title {
            font-size: 1.8rem;
            color: var(--accent);
        }

        
        .policy-card {
            background: var(--light);
            border-radius: 12px;
            padding: 20px;
            margin-bottom: 20px;
            border-left: 4px solid var(--primary);
        }

        
        .policy-title {
            font-size: 1.2rem;
            margin-bottom: 10px;
            color: var(--primary);
        }

        
        .features {
            display: grid;
            grid-template-columns: repeat(auto-fit, minmax(250px, 1fr));
            gap: 20px;
            margin: 30px 0;
        }

        
        .feature-card {
            background: white;
            border-radius: 12px;
            padding: 25px;
            text-align: center;
            box-shadow: 0 4px 10px rgba(0, 0, 0, 0.05);
            transition: var(--transition);
            border: 1px solid var(--border);
        }

        
        .feature-card:hover {
            transform: translateY(-5px);
            box-shadow: 0 8px 20px rgba(0, 0, 0, 0.08);
            border-color: var(--accent);
        }

        
        .feature-icon {
            font-size: 2.5rem;
            color: var(--primary);
            margin-bottom: 15px;
        }

        
        .feature-title {
            font-size: 1.2rem;
            margin-bottom: 10px;
            color: var(--dark);
        }

        
        .w3cschool-brand {
            background: rgba(67, 97, 238, 0.08);
            border-radius: 12px;
            padding: 25px;
            text-align: center;
            margin-top: 30px;
            border: 2px dashed var(--primary);
        }

        
        .brand-title {
            font-size: 1.5rem;
            color: var(--primary);
            margin-bottom: 15px;
        }

        
        .brand-logo {
            font-size: 2rem;
            font-weight: 800;
            color: var(--primary);
            margin: 15px 0;
        }

        
        .brand-button {
            display: inline-block;
            background: var(--primary);
            color: white;
            padding: 12px 30px;
            border-radius: 30px;
            text-decoration: none;
            font-weight: 600;
            margin-top: 10px;
            transition: var(--transition);
        }

        
        .brand-button:hover {
            background: var(--secondary);
            transform: translateY(-3px);
            box-shadow: 0 5px 15px rgba(67, 97, 238, 0.3);
        }

        
        footer {
            text-align: center;
            padding: 30px;
            color: var(--gray);
            font-size: 0.9rem;
            border-top: 1px solid var(--border);
            margin-top: 40px;
        }

        
        .disclaimer {
            background: #fff8e6;
            border-left: 4px solid var(--warning);
            padding: 15px;
            border-radius: 8px;
            margin: 20px 0;
            font-size: 0.9rem;
        }

        
        .highlight {
            color: var(--primary);
            font-weight: 600;
        }

        
        @media (max-width: 576px) {
            h1 {
                font-size: 2rem;
            }

            
            .subtitle {
                font-size: 1rem;
            }

            
            .calculator-title, .info-title {
                font-size: 1.5rem;
            }
        }
    </style>
</head>
<body>
    <div class="container">
        <header>
            <h1>国家育儿补贴计算器</h1>
            <p class="subtitle">根据2025年最新育儿补贴政策开发,精准计算您可领取的育儿补贴金额</p>
            <div class="badge">2025年7月28日最新政策</div>
        </header>

        
        <div class="main-content">
            <div class="calculator-container">
                <div class="calculator-header">
                    <i class="fas fa-calculator"></i>
                    <h2 class="calculator-title">补贴计算器</h2>
                </div>

                
                <div id="childrenContainer">
                    <div class="child-input-group">
                        <button class="remove-child" onclick="removeChild(this)" style="display: none;">
                            <i class="fas fa-times-circle"></i>
                        </button>
                        <div class="input-group">
                            <label for="birthDate1"><i class="fas fa-baby"></i> 宝宝出生日期</label>
                            <input type="date" id="birthDate1" class="child-birthdate" max="2028-12-31">
                        </div>
                    </div>
                </div>

                
                <div class="add-child-btn" onclick="addChild()">
                    <i class="fas fa-plus-circle"></i> 添加另一个宝宝
                </div>

                
                <button class="btn-calculate" onclick="calculateSubsidy()">
                    <i class="fas fa-calculator"></i> 计算我的补贴
                </button>

                
                <div class="disclaimer">
                    <i class="fas fa-info-circle"></i> 本计算器基于2025年7月28日发布的《育儿补贴制度实施方案》开发,计算结果仅供参考,具体以当地执行为准。
                </div>

                
                <div class="result-container" id="resultContainer">
                    <h3 class="result-title">您的育儿补贴计算结果</h3>
                    <div class="result-amount" id="totalAmount">¥0</div>
                    <p>根据政策规定和您提供的信息计算得出</p>

                    
                    <div id="childrenResults">
                        <!-- 每个宝宝的结果将在这里动态生成 -->
                    </div>

                    
                    <div class="result-details">
                        <p><strong>计算说明:</strong></p>
                        <ul>
                            <li>每月补贴金额:¥300元</li>
                            <li>补贴发放至宝宝满3周岁</li>
                            <li>2025年1月1日前出生的宝宝按剩余月数计算</li>
                        </ul>
                    </div>

                    
                    <div class="apply-section" style="margin-top: 20px;">
                        <h4><i class="fas fa-external-link-alt"></i> 申请渠道:</h4>
                        <p>1. 当地政务服务平台(如浙里办、粤省事)</p>
                        <p>2. 支付宝搜索【育儿补贴申请】</p>
                        <p>3. 街道社区服务中心线下办理</p>
                    </div>
                </div>
            </div>

            
            <div class="info-section">
                <div class="info-header">
                    <i class="fas fa-file-alt"></i>
                    <h2 class="info-title">2025育儿补贴政策解读</h2>
                </div>

                
                <div class="policy-card">
                    <h3 class="policy-title">政策要点</h3>
                    <p>根据2025年7月28日发布的《育儿补贴制度实施方案》:</p>
                    <ul>
                        <li><strong>补贴对象</strong>:所有3周岁以下婴幼儿</li>
                        <li><strong>补贴标准</strong>:每孩每年3600元(按月发放)</li>
                        <li><strong>过渡期</strong>:2025年1月1日前出生儿童按剩余月数计算</li>
                        <li><strong>发放方式</strong>:按月发放至监护人银行账户</li>
                    </ul>
                </div>

                
                <div class="policy-card">
                    <h3 class="policy-title">申请条件</h3>
                    <ul>
                        <li>申请人需为婴幼儿法定监护人</li>
                        <li>婴幼儿需具有中国国籍</li>
                        <li>按规定完成出生登记</li>
                        <li>符合当地其他相关规定</li>
                    </ul>
                </div>

                
                <div class="policy-card">
                    <h3 class="policy-title">常见问题解答</h3>
                    <ul>
                        <li><strong>Q:多胞胎如何计算?</strong><br>A:每个孩子单独计算补贴</li>
                        <li><strong>Q:补贴需要缴税吗?</strong><br>A:育儿补贴属于免税收入</li>
                        <li><strong>Q:何时开始申请?</strong><br>A:2025年9月1日起开放申请</li>
                    </ul>
                </div>

                
                <h3 style="margin: 25px 0 15px; color: var(--primary);">政策官方来源</h3>
                <ul>
                    <li><a href="https://www.gov.cn/zhengce/202507/content_7034132.htm" target="_blank">育儿补贴制度实施方案</a></li>
                    <li><a href="https://www.gov.cn/yaowen/liebiao/202507/content_7034150.htm" target="_blank">政策解读及问答</a></li>
                </ul>
            </div>
        </div>

        
        <div class="features">
            <div class="feature-card">
                <div class="feature-icon">
                    <i class="fas fa-calendar-check"></i>
                </div>
                <h4 class="feature-title">精准计算</h4>
                <p>基于最新政策设计算法,考虑过渡期等特殊情况</p>
            </div>

            
            <div class="feature-card">
                <div class="feature-icon">
                    <i class="fas fa-mobile-alt"></i>
                </div>
                <h4 class="feature-title">移动友好</h4>
                <p>响应式设计,在手机、平板和电脑上均可完美使用</p>
            </div>

            
            <div class="feature-card">
                <div class="feature-icon">
                    <i class="fas fa-shield-alt"></i>
                </div>
                <h4 class="feature-title">隐私保护</h4>
                <p>所有计算在本地完成,不收集任何用户数据</p>
            </div>

            
            <div class="feature-card">
                <div class="feature-icon">
                    <i class="fas fa-sync-alt"></i>
                </div>
                <h4 class="feature-title">实时更新</h4>
                <p>政策变化时及时更新计算规则</p>
            </div>
        </div>

        
        <div class="w3cschool-brand">
            <h3 class="brand-title">想自己开发这样的实用工具?</h3>
            <p>在<span class="highlight">编程狮(W3Cschool)</span>学习Web开发技术,掌握HTML、CSS和JavaScript:</p>
            <div class="brand-logo">编程狮</div>
            <p>零基础入门到项目实战,快速成为前端开发工程师</p>
            <a href="https://www.w3cschool.cn" class="brand-button" target="_blank">
                立即学习 <i class="fas fa-arrow-right"></i>
            </a>
        </div>

        
        <footer>
            <p>© 2025 国家育儿补贴计算器 - 本工具仅作为参考,具体政策执行以当地政府规定为准</p>
            <p>技术支持:编程狮(W3Cschool)前端开发团队</p>
        </footer>
    </div>


    <script>
        // 初始宝宝数量
        let childCount = 1;

        
        // 页面加载时设置默认日期
        window.addEventListener('DOMContentLoaded', () => {
            // 设置第一个宝宝的默认出生日期为2年前
            const defaultDate = new Date();
            defaultDate.setFullYear(defaultDate.getFullYear() - 2);
            document.getElementById('birthDate1').value = formatDate(defaultDate);
        });

        
        // 添加宝宝输入框
        function addChild() {
            childCount++;
            const container = document.getElementById('childrenContainer');

            
            const childGroup = document.createElement('div');
            childGroup.className = 'child-input-group';
            childGroup.innerHTML = `
                <button class="remove-child" onclick="removeChild(this)">
                    <i class="fas fa-times-circle"></i>
                </button>
                <div class="input-group">
                    <label for="birthDate${childCount}"><i class="fas fa-baby"></i> 宝宝出生日期</label>
                    <input type="date" id="birthDate${childCount}" class="child-birthdate" max="2028-12-31">
                </div>
            `;

            
            container.appendChild(childGroup);

            
            // 设置新宝宝的默认出生日期为1年前
            const defaultDate = new Date();
            defaultDate.setFullYear(defaultDate.getFullYear() - 1);
            document.getElementById(`birthDate${childCount}`).value = formatDate(defaultDate);
        }

        
        // 移除宝宝输入框
        function removeChild(button) {
            if (childCount <= 1) return;

            
            const childGroup = button.parentElement;
            childGroup.remove();
            childCount--;

            
            // 如果只剩一个宝宝,隐藏其删除按钮
            if (childCount === 1) {
                document.querySelector('.remove-child').style.display = 'none';
            }
        }

        
        // 计算补贴函数
        function calculateSubsidy() {
            // 获取所有宝宝的出生日期
            const birthInputs = document.querySelectorAll('.child-birthdate');
            const birthDates = [];

            
            for (let i = 0; i < birthInputs.length; i++) {
                if (!birthInputs[i].value) {
                    alert(`请填写第${i+1}个宝宝的出生日期`);
                    return;
                }
                birthDates.push(new Date(birthInputs[i].value));
            }

            
            // 计算每个宝宝的补贴
            let totalSubsidy = 0;
            const childrenResults = [];

            
            for (let i = 0; i < birthDates.length; i++) {
                const subsidy = calculateChildSubsidy(birthDates[i]);
                totalSubsidy += subsidy.amount;

                
                childrenResults.push({
                    birthDate: formatDate(birthDates[i]),
                    amount: subsidy.amount,
                    months: subsidy.months,
                    age: subsidy.age
                });
            }

            
            // 显示结果
            showResults(totalSubsidy, childrenResults);
        }

        
        // 计算单个宝宝的补贴
        function calculateChildSubsidy(birthDate) {
            const today = new Date();
            const threeYearsOld = new Date(birthDate);
            threeYearsOld.setFullYear(threeYearsOld.getFullYear() + 3);

            
            // 计算宝宝年龄(年+月)
            const ageYears = today.getFullYear() - birthDate.getFullYear();
            const ageMonths = today.getMonth() - birthDate.getMonth();
            const totalMonths = (ageYears * 12) + ageMonths;
            const age = totalMonths >= 12 ? 
                `${Math.floor(totalMonths/12)}岁${totalMonths%12}个月` : 
                `${totalMonths}个月`;

            
            // 检查是否已满3周岁
            if (today >= threeYearsOld) {
                return {
                    amount: 0,
                    months: 0,
                    age: age
                };
            }

            
            // 计算剩余月数(更精确的方法)
            let monthsRemaining = (threeYearsOld.getFullYear() - today.getFullYear()) * 12;
            monthsRemaining -= today.getMonth() + 1;
            monthsRemaining += threeYearsOld.getMonth() + 1;

            
            // 确保月数不为负
            monthsRemaining = Math.max(0, monthsRemaining);

            
            // 处理过渡期(2025年1月1日前出生)
            const policyStartDate = new Date('2025-01-01');
            let eligibleMonths = monthsRemaining;

            
            if (birthDate < policyStartDate) {
                // 计算过渡期可用月数
                const transitionMonths = Math.ceil((threeYearsOld - policyStartDate) / (30.44 * 24 * 60 * 60 * 1000));
                eligibleMonths = Math.min(eligibleMonths, transitionMonths);
            }

            
            // 计算总补贴金额
            const totalSubsidy = Math.round(300 * eligibleMonths);

            
            return {
                amount: totalSubsidy,
                months: eligibleMonths,
                age: age
            };
        }

        
        // 显示结果
        function showResults(total, childrenResults) {
            // 更新总金额
            document.getElementById('totalAmount').textContent = `¥${total.toLocaleString()}`;

            
            // 更新每个宝宝的结果
            const childrenResultsContainer = document.getElementById('childrenResults');
            childrenResultsContainer.innerHTML = '';

            
            childrenResults.forEach((child, index) => {
                const childResult = document.createElement('div');
                childResult.className = 'child-result';
                childResult.innerHTML = `
                    <p><strong>宝宝${index+1}</strong></p>
                    <p>出生日期:${child.birthDate}(当前年龄:${child.age})</p>
                    <p>可领取月数:${child.months}个月</p>
                    <p>补贴金额:<strong>¥${child.amount.toLocaleString()}</strong></p>
                `;
                childrenResultsContainer.appendChild(childResult);
            });

            
            // 显示结果容器
            document.getElementById('resultContainer').style.display = 'block';

            
            // 滚动到结果位置
            document.getElementById('resultContainer').scrollIntoView({ behavior: 'smooth', block: 'nearest' });
        }

        
        // 辅助函数:格式化日期为YYYY-MM-DD
        function formatDate(date) {
            const year = date.getFullYear();
            const month = String(date.getMonth() + 1).padStart(2, '0');
            const day = String(date.getDate()).padStart(2, '0');
            return `${year}-${month}-${day}`;
        }
    </script>
</body>
</html>

最终效果预览:
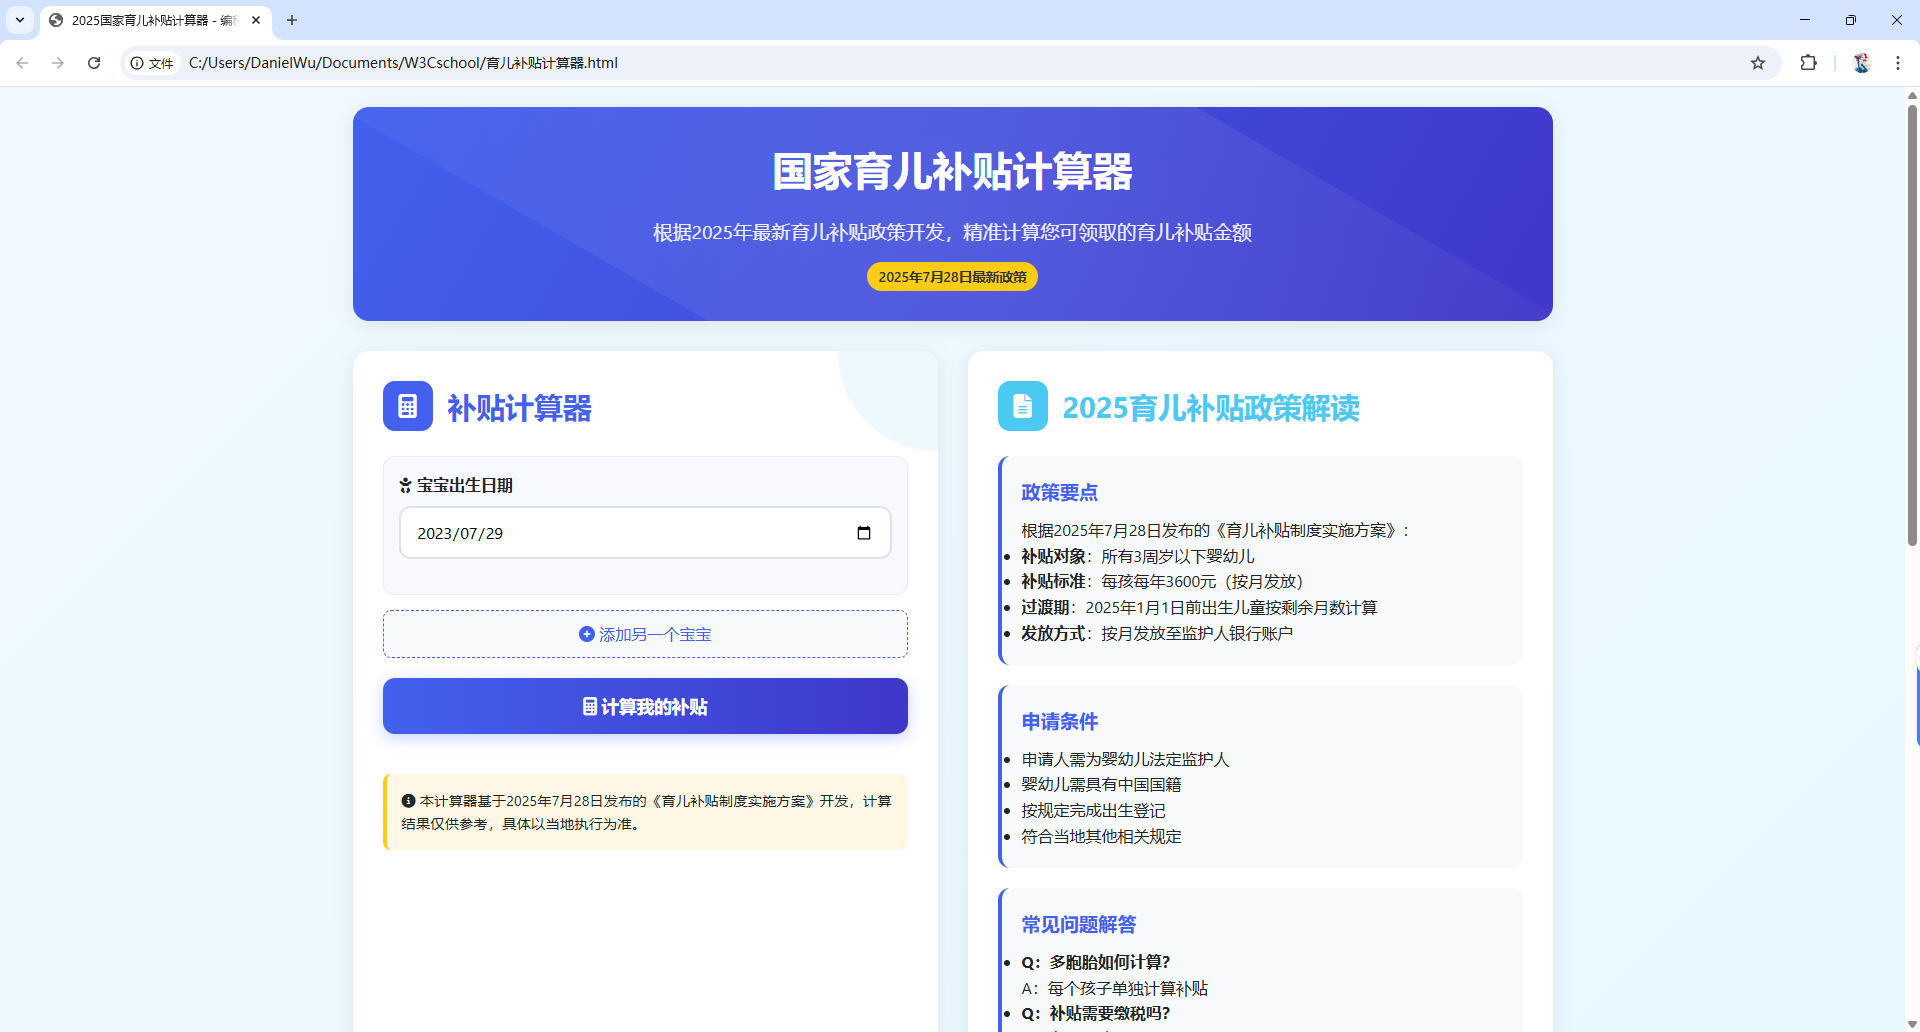
部署步骤

  1. 复制完整代码到文本编辑器
  2. 保存为 育儿补贴计算器.html
  3. 用浏览器打开即可使用
  4. 也可直接复制至HTML在线编辑器里面运行使用。

使用说明

  1. 添加宝宝
    • 默认显示一个宝宝输入框
    • 点击”添加另一个宝宝”按钮增加新输入框
    • 每个宝宝可单独设置出生日期
  2. 计算补贴
    • 点击”计算我的补贴”按钮
    • 系统为每个宝宝独立计算补贴金额
    • 显示总补贴金额和每个宝宝的详情
  3. 查看结果
    • 总补贴金额以大号字体显示
    • 每个宝宝的详情包括:
      • 出生日期
      • 当前年龄
      • 可领取月数
      • 补贴金额

六、学习资源推荐

在编程狮(W3Cschool)平台学习更多知识:

  1. 零基础入门

  2. 项目实战

  3. 进阶课程

在编程狮平台,我们相信”代码改变生活”。通过开发这样的实用工具,您不仅能提升编程技能,还能为社会创造真实价值!

Python 零基础入门教程 2025 最新版

thbcm阅读(418)

  • 阅读时长:每天 30 分钟,7 天闯关
  • 目标:0 基础 → 独立写 3 个小程序 → 拿到面试机会

Python 学习路线

天数 学习内容 编程狮任务 里程碑
Day1 环境+语法入门 在线写“你好, 编程狮 成功运行第一行代码
Day2 变量+字符串 制作“微信昵称生成器 掌握 f-string
Day3 列表+字典 完成“今日待办清单 能增删改查数据
Day4 条件+循环 写出“石头剪刀布”游戏 学会 if/for
Day5 函数+模块 封装“天气查询工具 会 import 第三方库
Day6 文件+异常 开发“记账本 会读写 txt/csv
Day7 综合项目 上线“个人博客 拥有可炫耀作品

Day1 环境搭建 & 第一段代码

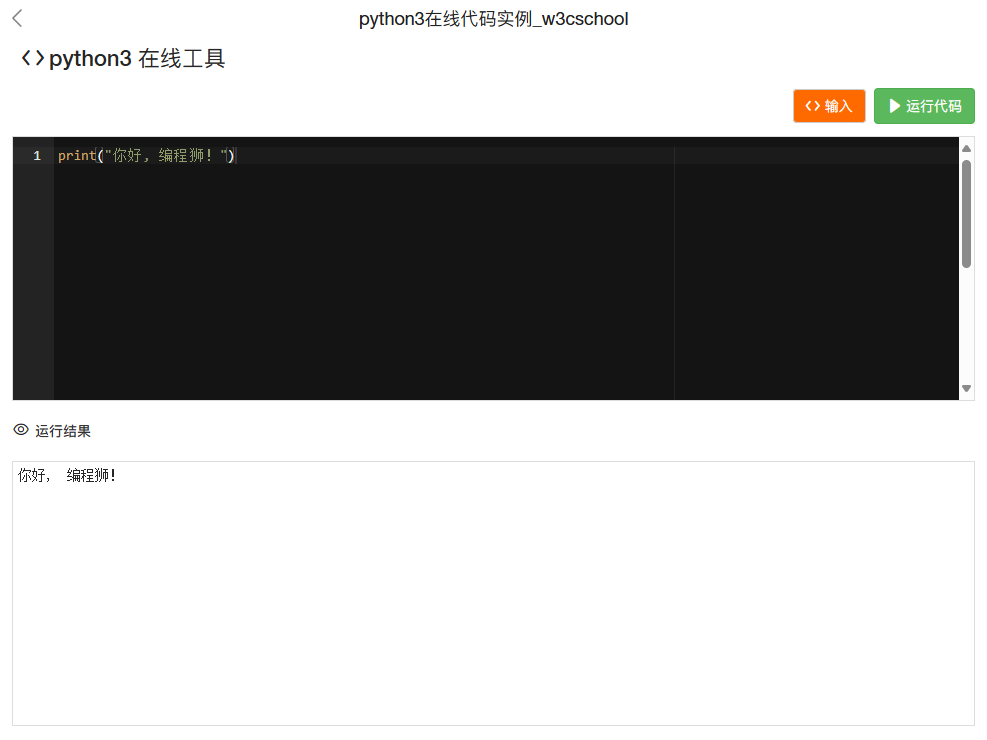
  1. 免安装方案
    打开 编程狮在线Python编辑器,直接写:

    print("你好, 编程狮!")

    点击「运行」,看到输出即成功!

  2. 本地安装

    python -V

    出现 Python 3.13.x 即成功。

Day2 变量 & 字符串

  1. 首先,将代码黏贴到记事本中保存为一个 Python 文件,比如命名为 wechat_nickname.py

    name = input("请输入你的名字:")


    # 定义不同风格的昵称模板
    styles = [
    f"{name}的小宇宙",
    f"{name}不emo",
    f"{name}在摸鱼",
    f"{name}超好运",
    f"{name}在努力",
    f"快乐{name}",
    f"{name}向前冲",
    f"{name}的日常"
    ]


    print("\n为你推荐的微信昵称:")
    for i, nickname in enumerate(styles, 1):
    print(f"{i}. {nickname}")

  2. 确保你的电脑上已经安装了 Python 环境(如果没有,可以参考Python 3.13.3 安装教程
  3. 运行这个 Python 文件:

    • 打开文件所在文件夹
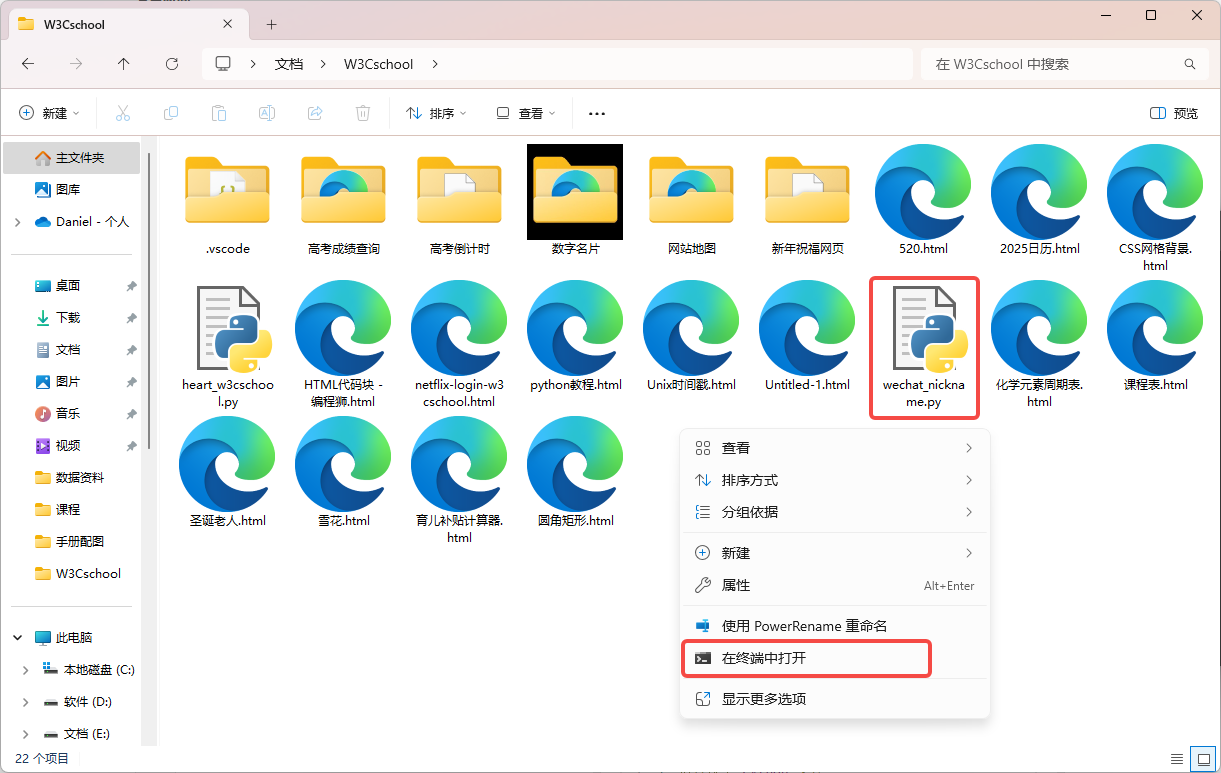
    • 鼠标右键单击空白位置,鼠标左键单击“在终端中打开

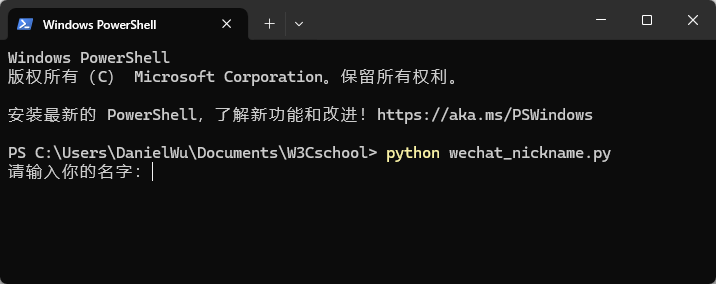
    • 输入命令:python wechat_nickname.py 并按回车

  4. 程序会提示你 “请输入你的名字:”,这时输入你的名字并按回车
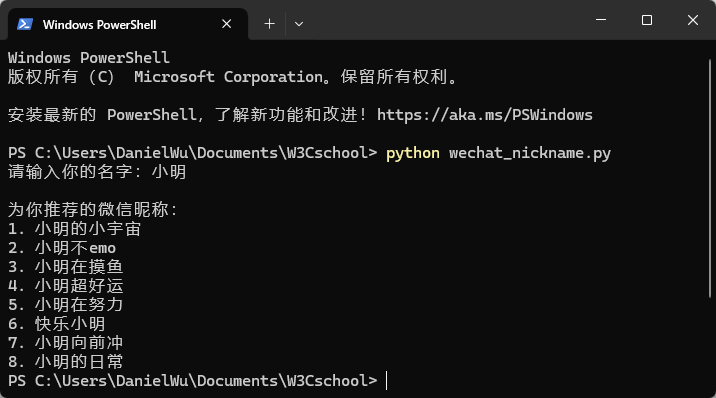
  5. 程序就会立即显示出为你生成的多种微信昵称选项,如输入“小明”

  • 变量名只能包含字母、数字、下划线
  • f-string:最推荐的字符串格式化方式

Day3 列表 & 字典

# 今日待办清单
todo = ["买菜", "学习 Python", "跑步"]
todo.append("刷编程狮视频")     # 追加
todo[1] = "学习 Python 列表"   # 修改
print("今日任务:", todo)

 
# 用字典记录成绩
score = {"数学": 90, "Python": 100}
score["英语"] = 88
print("我的成绩单:", score)

Day4 条件 & 循环

# 石头剪刀布小游戏
import random

 
choice = input("请输入石头/剪刀/布:")
computer = random.choice(["石头", "剪刀", "布"])
print("电脑出:", computer)

 
if choice == computer:
    print("平局!")
elif (choice == "石头" and computer == "剪刀") or \
     (choice == "剪刀" and computer == "布") or \
     (choice == "布" and computer == "石头"):
    print("你赢了!")
else:
    print("你输了!")

Day5 函数 & 模块

# 天气查询工具(调用公开接口)
import requests

 
def weather(city: str) -> str:
    url = f"https://api.vvhan.com/api/weather?city={city}"
    res = requests.get(url).json()
    return res["data"]

 
print(weather("北京"))

  • 学会 pip install requests
  • 学会定义函数 + 返回值

Day6 文件 & 异常

# 记账本
import csv, datetime


def add_record(item, price):
    with open("bill.csv", "a", newline="", encoding="utf-8") as f:
        writer = csv.writer(f)
        writer.writerow([datetime.date.today(), item, price])

 
try:
    add_record("奶茶", 12)
    print("记账成功!")
except Exception as e:
    print("出错:", e)

Day7 综合项目:上线个人博客

使用 Flask 框架 10 行代码上线:

from flask import Flask, render_template_string


app = Flask(__name__)


HTML = """
<!doctype html>
<title>编程狮博客</title>
<h1>欢迎来到 {{name}} 的博客</h1>
"""


@app.route("/")
def home():
    return render_template_string(HTML, name="阿狮")


app.run()

  • 部署到 自己的服务器、码云、github, 发个朋友圈或分享到小红书!

每日常用快捷键

场景 快捷键
运行代码 Ctrl + Enter(在线编辑器)
自动补全 Tab
格式化 Shift + Alt + F(VSCode)

想要更系统的学习 Python3 可以继续访问《Python零基础到高薪就业

HTML5 标签大小写终极避坑指南

thbcm阅读(380)

——由编程狮(w3cschool.cn)2025 年 8 月最新整理

一句话结论

普通 HTML5 标签/属性 统一小写

SVG、MathML、自定义元素 区分大小写;其余场景一律小写,写错就白屏!

一、为什么大小写突然成了“坑”?

很多新手以为 HTML5 已经全部“大小写不敏感”,结果:

  • 复制了一段 SVG,页面直接空白;
  • 自定义组件死活不渲染;
  • 百度 SEO 报告提示“大量大写标签影响解析速度”。

别急,下面 3 分钟带你一次扫清所有盲区。

二、4 大场景对照表(收藏级)

场景 是否区分大小写 推荐写法 写错后果
普通 HTML5 标签/属性  不区分 全小写 团队代码风格混乱
<!doctype html>  不区分 小写 无功能影响,但 SEO 扣分
SVG / MathML  严格区分 按规范大小写 图形不渲染
自定义元素(Custom Elements)  严格区分 小写+中划线 组件注册失败

三、实战演练:3 个在线小实验

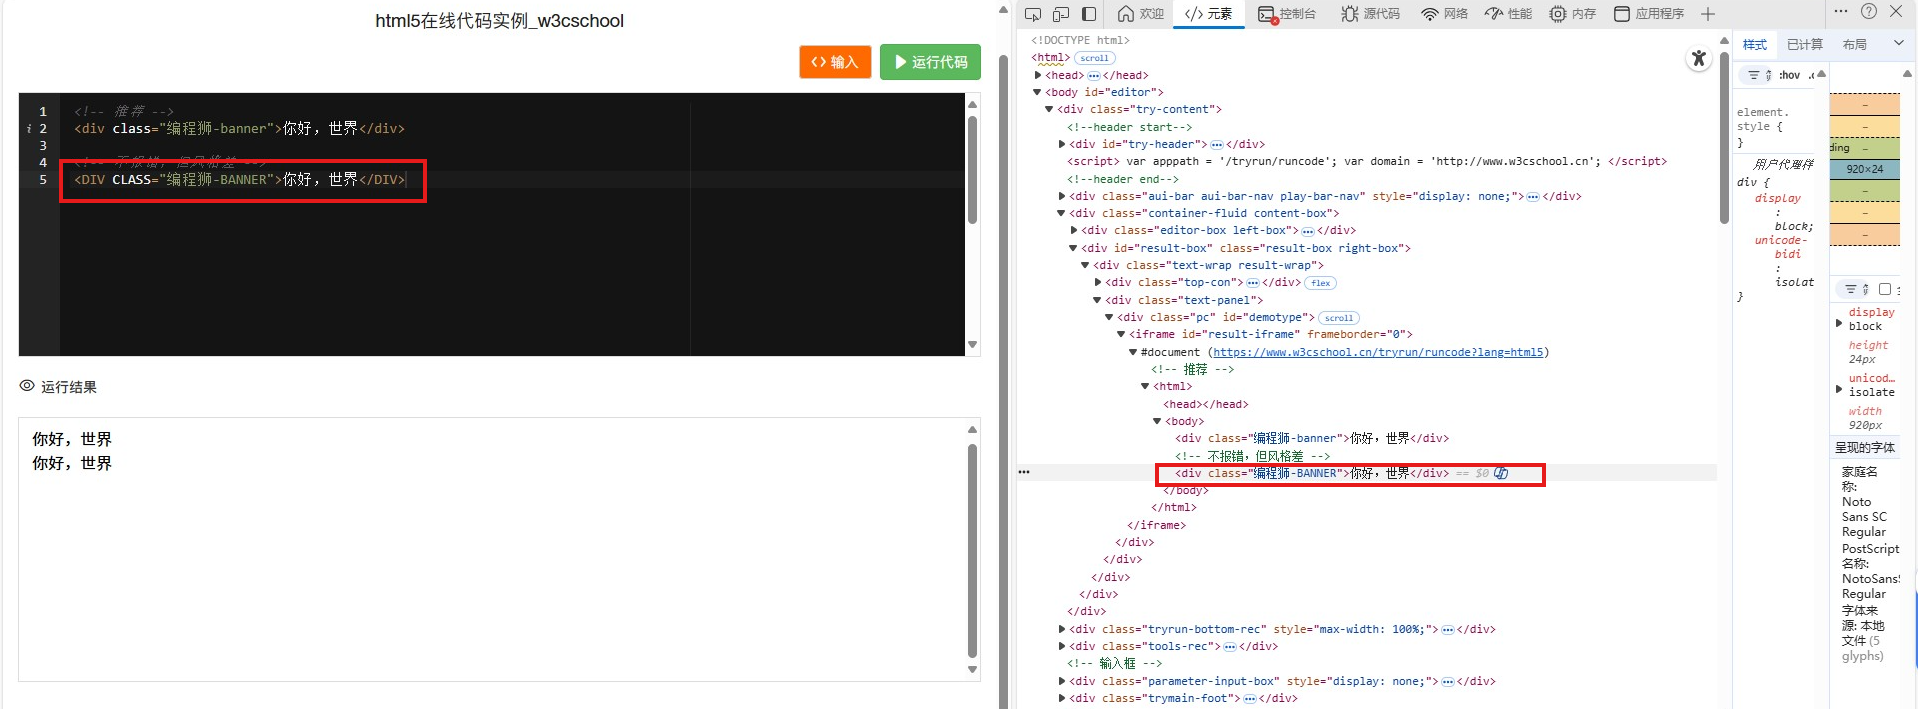
实验 1:普通标签大小写无感

打开 编程狮 HTML5 在线编辑器 → 输入:

<!-- 推荐 -->
<div class="编程狮-banner">你好,世界</div>


<!-- 不报错,但风格差 -->
<DIV CLASS="编程狮-BANNER">你好,世界</DIV>

按 F12 → Elements,浏览器已自动转为小写。

实验 2:SVG 大小写敏感

<!-- 错误:viewbox 全小写 → 矩形消失 -->
<svg width="100" height="100">
  <rect x="0" y="0" width="100" height="100" fill="red" viewbox="0 0 100 100" />
</svg>


<!-- 正确:viewBox 驼峰 -->
<svg width="100" height="100" viewBox="0 0 100 100">
  <rect x="0" y="0" width="100" height="100" fill="red" />
</svg>

实验 3:自定义元素大小写

// 定义组件
class W3cSchoolCard extends HTMLElement {
  constructor() {
    super();
    this.innerHTML = `<p>Hello from 编程狮!</p>`;
  }
}
customElements.define('w3cschool-card', W3cSchoolCard);

<!-- 正确 -->
<w3cschool-card></w3cschool-card>


<!-- 错误:浏览器不识别 -->
<W3CSCHOOL-CARD></W3CSCHOOL-CARD>

四、一句话速背口诀

“普通小写稳如山,SVG/MathML 照规范,自定义组件全小写,百度 SEO 不翻车。”

五、团队代码规范模板(直接复制用)

.prettierrc.editorconfig 里加:

{
  "htmlWhitespaceSensitivity": "ignore",
  "overrides": [
    {
      "files": "*.svg",
      "options": { "parser": "xml", "xmlWhitespaceSensitivity": "strict" }
    }
  ]
}

配合 Git 钩子,提交前自动格式化,大小写零冲突。

六、延伸阅读

联系我们